use rand::{random};

  static mut ERROR: isize = 0;

  struct File;

  #[allow(unused_variables)]
fn read(f: &File, save_to: &mut Vec<u8>) -> usize {
      if random() && random() && random() {
         unsafe {
             ERROR = 1;
         }
     }
     0
 }

 #[allow(unused_mut)]
 fn main() {
     let mut f = File;
     let mut buffer = vec![];

     read(&f, &mut buffer);
     unsafe {
         if ERROR != 0 {
             panic!("An error has occurred!")
         }
     }
 }
第二个例子,停机标志
#![cfg(not(windows))]

extern crate libc;

use std::time;
use std::thread::{sleep};
use libc::{SIGTERM, SIGUSR1};

static mut SHUT_DOWN: bool = false;

fn main() {
    register_signal_handlers();

    let delay = time::Duration::from_secs(1);

    for i in 1_usize.. {
        println!("{}", i);
        unsafe {
            if SHUT_DOWN {
                println!("*");
                return;
            }
        }

        sleep(delay);

        let signal = if i > 2 {
            SIGTERM
        } else {
            SIGUSR1
        };
        unsafe {
            libc::raise(signal);
        }
    }
    unreachable!();
}

fn register_signal_handlers() {
    unsafe {
        libc::signal(SIGTERM, handle_sigterm as usize);
        libc::signal(SIGUSR1, handle_sigusr1 as usize);
    }
}

#[allow(dead_code)]
fn handle_sigterm(_signal: i32) {
    register_signal_handlers();

    println!("SIGTERM");

    unsafe {
        SHUT_DOWN = true;
    }
}

#[allow(dead_code)]
fn handle_sigusr1(_signal: i32) {
    register_signal_handlers();

    println!("SIGUSR1");
}
如果不想用 unsafe代码,可以用 lazy_static! 宏
use lazy_static::lazy_static;
use regex::Regex;

lazy_static! {
    static ref RE: Regex = Regex::new(r"hello (\w+)!").unwrap();
}

fn main() {
    let text = "hello bob!\nhello sue!\nhello world!\n";
    for cap in RE.captures_iter(text) {
        println!("your name is: {}", &cap[1]);
    }
}
l 购买目的地SIM卡使用:到达目的地后购买并更换SIM卡使用,或者插入到双卡手机,总之需要占用一个卡槽;
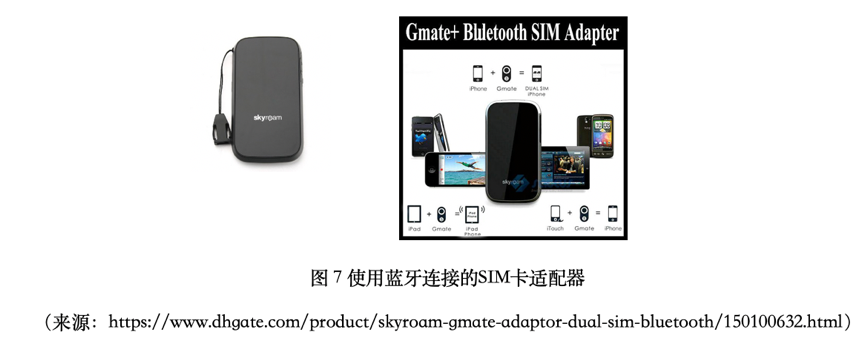
l 插卡MiFi(随身无线路由器):使用可以插卡的上网设备(俗称插卡猫),购买目的地的SIM卡,并插入到设备中使用。设备提供Wifi热点信号,供移动设备连接使用。设备连接的网络和具备的连接能力,依赖于所购买的SIM卡。
l 免插卡MiFi:无需插卡,只要购买所需的流量包,就可以使用上网功能。流量包可能是全球多个国家通用的,使用方便,且价格上普遍比插卡MiFi更便宜。
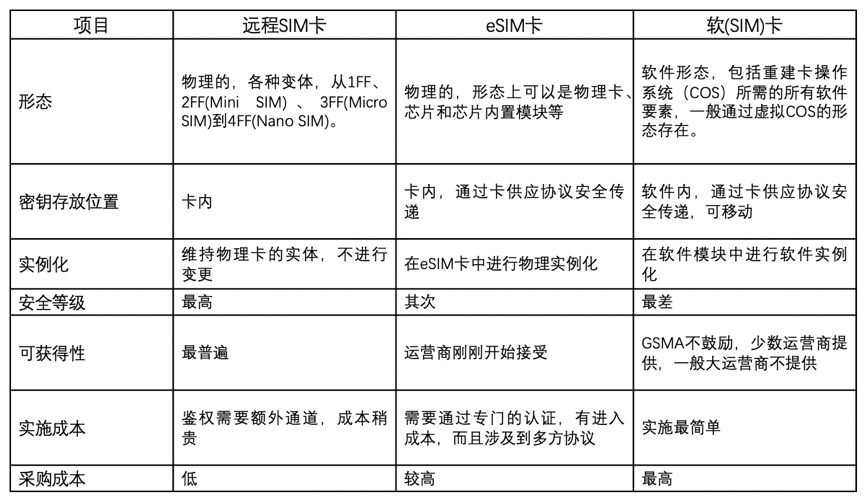
l eSIM技术:通过其他网络(如WiFi)在线购买目的地运营商提供的eSIM卡进行上网。但目前该技术并不受大多数运营商欢迎,因此在市场上普遍供应不足。从苹果公司的Apple SIM推进情况就可以得到印证。Apple Watch开通上网卡在中国一波三折,更别说其他品牌的移动电话了。所以说,eSIM技术的推广运营商的供应是关键。
l 软卡技术:这也是目前市面上比较常用的技术,如华为天际通、红茶移动都是使用这一技术。
l 手机内嵌全球上网技术:使用云端卡池,用户根据自身需要选择购买对应流量套餐并激活使用。优克联在2018年巴塞罗那移动大会上推出世界手机S1就是使用了这个技术,通过GlocalMe Inside方案将远程虚拟卡技术整合到手机的基带中。目前小米部分型号手机支持该功能,估计未来还会有更多品牌和型号的手机陆续支持。
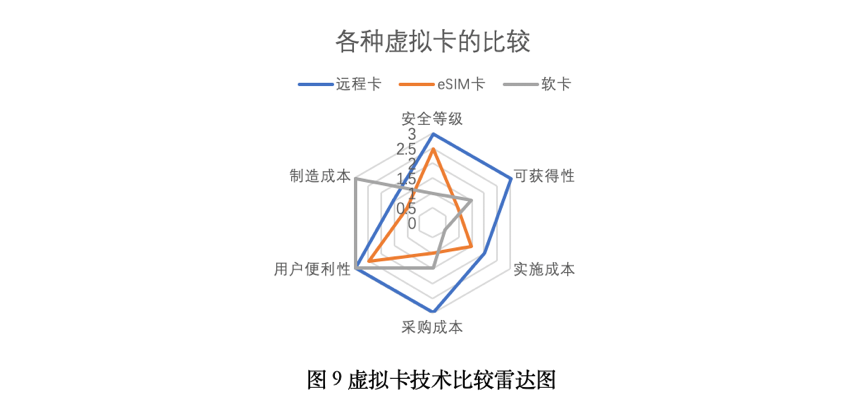
从以上分析可以看出:
l eSIM技术是官方推出的技术,但运营商不热心,叫好不叫座也没有办法。
l 软卡技术,由于存在安全风险,GSMA不建议使用,运营商及相关厂商投鼠忌器,不敢大规模推广。
l 免插卡MiFi是相对性能优异且安全的技术,但需要携带额外的设备,造成了一定负担。一些免插卡MiFi兼顾充电宝功能,用户接受度更高。
l 直接将免插卡MiFi的技术植入手机,是更符合用户期望的方式,不影响用户原有SIM卡的使用,性能和安全性也最有保障。
2.在项目根目录下的 build.gradle 里添加
id “org.mozilla.rust-android-gradle.rust-android” version “0.9.2”
例如
plugins {
    id 'com.android.application' version '7.1.2' apply false
    id 'com.android.library' version '7.1.2' apply false
    id "org.mozilla.rust-android-gradle.rust-android" version "0.9.2"
}
3. 在 app/build.gradle 里添加
android {
...
}

cargo {
    module  = "./src/main/rust/softsim"       // Or whatever directory contains your Cargo.toml
    libname = "softsim"                       // Or whatever matches Cargo.toml's [package] name.
    targets = ["arm", "arm64"]                // See bellow for a longer list of options
    profile = 'release'                      // default debug
    pythonCommand = "python3"
}

dependencies {
   .....
}

tasks.whenTaskAdded { task ->
    if ((task.name == 'javaPreCompileDebug' || task.name == 'javaPreCompileRelease')) {
        task.dependsOn 'cargoBuild'
    }
}
/**
     * Set the subscription which will be used by default for data, with the subscription which
     * the supplied subscription ID corresponds to; or throw a RuntimeException if the supplied
     * subscription ID is not usable (check with {@link #isUsableSubscriptionId(int)}).
     *
     * @param subscriptionId the supplied subscription ID
     *
     * @hide
     */
    @SystemApi
    @RequiresPermission(android.Manifest.permission.MODIFY_PHONE_STATE)
    public void setDefaultDataSubId(int subscriptionId) {
        if (VDBG) logd("setDataSubscription sub id = " + subscriptionId);
        try {
            ISub iSub = TelephonyManager.getSubscriptionService();
            if (iSub != null) {
                iSub.setDefaultDataSubId(subscriptionId);
            }
        } catch (RemoteException ex) {
            // ignore it
        }
    }
    public static int setSimForDataWithStatusToast(Context context, int arg3) {
        int result = SmartSimUtils.setSimForData(context, arg3);
        Toast.makeText(context, SmartSimUtils.mapDDSSwitchStatusToMessageResId(result), 1).show();  // 切换可能需要1分钟
        SmartSimUtils.notifyDdsAssistantSlotChanged(context);
        return result;
    }


    public int setDefaultDataSubIdWithNwAutoSwitch(int arg1) {
        return this.mManager.setDefaultDataSubIdWithNwAutoSwitch(arg1);
    }


    public MotoExtTelephonyManagerAdapter(Context arg2) {
        this.mManager = new MotoExtTelephonyManager(arg2);
    }
[profile.release]
opt-level = 'z'     # Optimize for size.
lto = true          # Enable Link Time Optimization
codegen-units = 1   # Reduce number of codegen units to increase optimizations.
panic = 'abort'     # Abort on panic
strip = true        # Strip symbols from binary*