联发科手机重要分区

nvcfg​分区

作用: This partition stores variable configs of NVDATA and NVRAM.​

nvdata​分区

作用: This partition stores variable data of secure and identifying infos for your device. Like IMEI, WiFi MAC, Bluetooth MAC, calibration data and others.​

ext4 文件系统

nvram​分区

作用: This partition stores persistent data of secure and identifying infos for your device. Like IMEI, WiFi MAC, Bluetooth MAC, calibration data and others.​

nvram称为binregion分区,是一个备份分区。 没有文件系统, 格式是自定义的。

persist​分区

作用: This partition stores persistent data for factory reset protection. Like google account and miaccount/micloud

proinfo​分区

作用: This partitions stores persistent data of default structure for NVRAM/RADIO/MODEM/BASEBAND

protect1 (或者叫 protect_f)​ 分区

作用: This partition stores variable data of SIM/RADIO/MODEM/BASEBAND settings and infos.​

protect2 (or protect_s)

Description: This partition stores variable data of SIM/RADIO/MODEM/BASEBAND settings and infos.​

Sim Lock 相关数据在 protect中
从WR8.W1244.DNR.WG.MP开始的Smart Phone版本都将SIM Lock存到protect_f和protect_s中了

挂载 于 /mnt/vendor/protect_f 和 /mnt/vendor/protect_s, 也都是ext4 文件系统

frp分区

flashinfo分区

otp 分区

seccfg


/dev/block/by-name/nvdata 挂载到 /mnt/vendor/nvdata 目录,文件系统是 ext4

APCFG/APRDEB/BT_Addr
        WIFI

md/NVRAM/
     BACKUP
     CALIBRAT
     NVD_DATA
     NVD_IMEI

Format All+Download

会擦除所有分区,所有NVRAM LID都会用code中的默认值重新生成。全擦后只有触发备份过,binregion中才会有备份内容,

否则binregion是空的(Flash默认的全0 or 全f)。

Firmware Upgrade(固件更新) Factory Reset(恢复出厂设置)

只会擦除nvdata分区, 开机时AP 会将 binregion(nvram分区) 中备份的(1) CALIBRAT和 (2) NVD_IMEI两个目录还原到nvdata分区
具体的NVRAM LID 是IMEI、 barcode、Calibration数据和4G RF driver参数。 (3) 其他NVRAM LID恢复为code中的默认值。

protect_f和protect_s分区不会被擦除,所以SIM Lock保持不变。

如果binregion是空的,那么IMEI、 barcode、Calibration数据和4G RF driver参数也会用code中的默认值重新生成。


Download Only、OTA、SD upgrade 、Push modem

不会擦除任何分区。这种升级方式下,如果有修改code中的default值,那么需要将相应NVRAM LID的VERNO+1,才会生效,即将会利用code中的默认值重新生成新文件。
注意:这里所说的所有分区和任何分区均指Modem NVRAM的四个分区:nvdata分区、 protect_f分区、protect_s分区和binregion(nvram)分区。


具有NVRAM_CATEGORY_USER属性的NVRAM,会存到/mnt/vendor/nvdata/md/NVRAM/NVD_DATA 目录。
里面存的是普通NVRAM, 2G RF driver NVRAM,3G RF driver NVRAM。
(从92Modem开始有将部分4G RF driver NVRAM从CALIBRAT属性修改为USER属性,也就是从CALIBRAT目录移到了NVD_DATA目录)

具有NVRAM_CATEGORY_INTERNAL属性的NVRAM,会存到/mnt/vendor/nvdata/md/NVRAM/NVD_CORE/目录。
里面只存了NVRAM_EF_SYS_LID这只NVRAM,由于具有NVRAM_ATTR_MULTIPLE属性,该目录下有A,B两只文件。

具有NVRAM_CATEGORY_CALIBRAT属性的NVRAM,会存到/mnt/vendor/nvdata/md/NVRAM/CALIBRAT/目录。
里面存了barcode,calibration NVRAM,部分4G RF driver NVRAM。

具有NVRAM_CATEGORY_IMPORTANT属性的NVRAM,会存到/mnt/vendor/nvdata/md/NVRAM//NVD_IMEI/目录。
80/90/91Modem里面只存了NVRAM_EF_IMEI_IMEISV_LID(IMEI)这只NVRAM。
92Modem添加了NVRAM_EF_NVRAM_LOCK_LID(IMEI Lock)这只NVRAM。
93Modem新加入了5只NVRAM(C2K相关的3只NVRAM)。

具有NVRAM_CATEGORY_IMPORTANT_L4属性的NVRAM,会存到/mnt/vendor/protect_f/md/目录,如果该NVRAM具有NVRAM_ATTR_MULTIPLE属性,会有相应的B文件存在/mnt/vendor/protect_s/md/目录。

里面存了NVRAM_EF_SML_LID(SIM Lock), NVRAM_EF_SIM_LOCK_LID(也是SIM Lock,默认不会用到) ,NVRAM_EF_IMPT_COUNTER_LID(这只NVRAM可以不用care,没实用,从92Modem开始移到了NVD_DATA)。 93Modem新加入了3只NVRAM。

在flash上存储的NVRAM 对应的文件名是由文件名前缀,中间连接符和文件名后缀构成。文件名后缀就是NVRAM LID对应的VERNO。那么代码中将对应的NVRAM LID VERNO+1后,去flash上面读写这只文件的时候,就会发现不存在,那么就会用code中的默认值重新生成新文件

假设修改的是NVRAM_EF_IMS_PROFILE_LID这只NVRAM的默认值,它的文件名前缀MT79,升级前的NVRAM_EF_IMS_PROFILE_LID_VERNO号是000,修改默认值后将NVRAM_EF_IMS_PROFILE_LID_VERNO修改为001,那么Download Only升级前 /mnt/vendor/nvdata/md/NVRAM/NVD_DATA/目录中就有MT79_000这只文件。升级后,当读写到这只NVRAM的时候,是按MT79_001去NVD_DATA目录找这只文件,发现没有就会用代码中的默认值重新生成新文件MT79_001。

具有NVRAM_CATEGORY_IMPORTANT或NVRAM_CATEGORY_IMPORTANT_L4属性的NVRAM LID不能通过VERNO+1方式升级,否则就会有modem assert,如NVRAM_EF_IMEI_IMEISV_LID(IMEI)和NVRAM_EF_SML_LID(SIM Lock),这是我们的design,是对IMEI和SIM Lock的保护。

校准NVRAM LID和Barcode(NVRAM_EF_BARCODE_NUM_LID)也不能通过VENRO+1的方式升级,否则校准参数/Barcode就丢失了


NVRAM数据结构

MTK平台采用LDI(Logical Data Item)和LDI Table哈希表的数据结构来管理NV Item列表。

NVRAM LID table就是由一个个具体NVRAM LID的结构构成。

包括9项参数:LID,total_records,size, default_value,category,attr, fileprefix,fileverno,description。
其中 description,目前对于Smart Phone平台来说都是NULL,没有使用,是Feature Phone遗留下来的, 说明这个item的功能的

LID Entry
nvram_Itable_entry_struct {
   uint16 LID,
   uint16 total_records,
   unit32 size
   uint8  const * default_value,
   uint32 category,
   uint16  attr,
   char fileprefix[4+1],
   char fileverno[3+1],
   char * description
}

LID文件 组成
记录1
校验和1
记录2
校验和2

kal_bool nvram_external_read_data(nvram_lid_enum LID, kal_uint16 rec_index, kal_uint8 *buffer, kal_uint32 buffer_size);

kal_bool nvram_external_write_data(nvram_lid_enum LID, kal_uint16 rec_index, kal_uint8 *buffer, kal_uint32 buffer_size);

kal_bool nvram_external_reset_data(nvram_lid_enum LID, kal_uint16 rec_index, kal_uint16 rec_amount);

PC META工具可以读写备份NV相关文件

vendor\mediatek\proprietary\external\nvram

https://github.com/hyperion70/HSPA_MOLY.WR8.W1449.MD.WG.MP.V16/blob/master/service/nvram/src/nvram_main.c


修改modem的对应的nvram的值分两种方式:

1.在code里修改默认值,这样修改的好处就是即使恢复出厂设置,或者升级软件,这个修改也是生效的;
修改默认值分两种case:

[1]这个feature是定义在除NVRAM_EF_SBP_MODEM_CONFIG_LID/NVRAM_EF_SBP_MODEM_DATA_CONFIG_LID的其他NVRAM里的:
以要disable bit 1: slotFormat4 and bit 4: supportEDPDCHPowerInterpolation in “r7_cap2”为例:
查看文档可以看到这个是定义在NVRAM_EF_UMTS_USIME_RRC_DYNAMIC_CAP_LID里,要修改default值的话,首先贵司要了解NVRAM的一些基本内容,比如
nvram的dafault值在哪里定义的,首先搜这个LID的total这个参数,以NVRAM_EF_UMTS_USIME_RRC_DYNAMIC_CAP_LID为例,就是搜索
NVRAM_EF_UMTS_USIME_RRC_DYNAMIC_CAP_TOTAL,搜到包含这个NVRAM_EF_UMTS_USIME_RRC_DYNAMIC_CAP_TOTAL的.c文件,而不是.h文件,贵司可以看
到这个是对NVRAM_EF_UMTS_USIME_RRC_DYNAMIC_CAP_LID的元素的基本定义,其中第四个参数就是default值。

举例,NVRAM_EF_UMTS_USIME_RRC_DYNAMIC_CAP_LID的元素定义就在nvram_data_items.c里,内容如下:
{
NVRAM_EF_UMTS_USIME_RRC_DYNAMIC_CAP_LID,
NVRAM_EF_UMTS_USIME_RRC_DYNAMIC_CAP_TOTAL,
NVRAM_EF_UMTS_USIME_RRC_DYNAMIC_CAP_SIZE,
NVRAM_NORMAL(NVRAM_EF_UMTS_USIME_RRC_DYNAMIC_CAP_DEFAULT),
NVRAM_CATEGORY_USER,
NVRAM_ATTR_AVERAGE,
#ifdef __UMTS_FDD_MODE__
“UM04”,
#endif
#ifdef __UMTS_TDD128_MODE__
“UM05”,
#endif
VER(NVRAM_EF_UMTS_USIME_RRC_DYNAMIC_CAP_LID)
},
可以看到第4个参数是:NVRAM_EF_UMTS_USIME_RRC_DYNAMIC_CAP_DEFAULT
点进这个default值看一下,贵司可以看到注释里有:r7_cap2:
/* r7_cap2: USIME_R7_Cap2
* bit 8~7: not used
* bit 6: supportofPSHandoverToGAN
* bit 5: supportofTxDivOnNonMIMOChannel
* bit 4: supportEDPDCHPowerInterpolation
* bit 3: supportForTwoDRXSchemesInPCH
* bit 2: supportForEDPCCHPowerBoosting
* bit 1: slotFormat4 */
0x00+ /* supportofPSHandoverToGAN: 0x20 supported, 0x00 not supported */
0x00+ /* supportofTxDivOnNonMIMOChannel: 0x10 supported, 0x00 not supported */
0x00+ /* supportEDPDCHPowerInterpolation: 0x08 supported, 0x00 not supported */
0x04+ /* supportForTwoDRXSchemesInPCH: 0x04 supported, 0x00 not supported */
0x02+ /* supportForEDPCCHPowerBoosting: 0x02 supported, 0x00 not supported */
0x01 /* slotFormat4: 0x01 supported, 0x00 not supported */
#endif /* __UMTS_R7__ */

比如说,我现在要disable bit 1,只要修改为:
/* r7_cap2: USIME_R7_Cap2
* bit 8~7: not used
* bit 6: supportofPSHandoverToGAN
* bit 5: supportofTxDivOnNonMIMOChannel
* bit 4: supportEDPDCHPowerInterpolation
* bit 3: supportForTwoDRXSchemesInPCH
* bit 2: supportForEDPCCHPowerBoosting
* bit 1: slotFormat4 */
0x00+ /* supportofPSHandoverToGAN: 0x20 supported, 0x00 not supported */
0x00+ /* supportofTxDivOnNonMIMOChannel: 0x10 supported, 0x00 not supported */
0x00+ /* supportEDPDCHPowerInterpolation: 0x08 supported, 0x00 not supported */
0x04+ /* supportForTwoDRXSchemesInPCH: 0x04 supported, 0x00 not supported */
0x02+ /* supportForEDPCCHPowerBoosting: 0x02 supported, 0x00 not supported */
#endif /* __UMTS_R7__ */
就可以了。

最后,修改完之后,要生效的话,需要升级这个nvram lid的verno,只需要找到这个nvram verno,然后加1就可以了。
以NVRAM_EF_UMTS_USIME_RRC_DYNAMIC_CAP_LID为例,他的verno值就是NVRAM_EF_UMTS_USIME_RRC_DYNAMIC_CAP_LID_VERNO,如果它原来是018的话
,将其修改为019就可以了,或者贵司不想修改verno值的话,那total format之后升级,也可以达到更新nvram的目的。

[2]这个feature是定义在除NVRAM_EF_SBP_MODEM_CONFIG_LID/NVRAM_EF_SBP_MODEM_DATA_CONFIG_LID;
以Disable “MM_RETRY_ABNORMAL_LAI_TIMER” and Enable “PLMN_SEARCH_AFTER_LU_ABNORMAL”为例:
disable “MM_RETRY_ABNORMAL_LAI_TIMER”对应的是SBP_MM_DISABLE_RETRY_ABNORMAL_LAI,
Enable “PLMN_SEARCH_AFTER_LU_ABNORMAL”对应的是SBP_MM_PERFORM_PLMN_SEARCH_AFTER_LU_ABNORMAL,关于sbp的enum值可参见
sbp_md_feature_enum。

像这种修改SBP NVRAM的feature也是一样,先找到default值在哪里,以NVRAM_EF_SBP_MODEM_CONFIG_LID为例,他的defaut值就是
:NVRAM_EF_SBP_MODEM_CONFIG_DEFAULT,通过sbp_md_feature_enum我们可以知道SBP_MM_DISABLE_RETRY_ABNORMAL_LAI是第1个字节第4个bit(从1
数起),SBP_MM_PERFORM_PLMN_SEARCH_AFTER_LU_ABNORMAL对应第4个字节的第7个bit,要enable的话,只需要将这个bit改为1,要disable的话,只需
改为0。

举例,disable SBP_MM_DISABLE_RETRY_ABNORMAL_LAI的话,只需要找到NVRAM_EF_SBP_MODEM_CONFIG_DEFAULT,看到他的第1个字节第4个bit是这样
定义的:
#if defined(__MM_DISABLE_RETRY_ABNORMAL_LAI__)
0x08 |
#endif
之所以还有宏控制,是因为要兼容以前的版本,要disable的话,只需要将这三行全部注释掉:
//#if defined(__MM_DISABLE_RETRY_ABNORMAL_LAI__)
// 0x08 |
//#endif
同时要enable SBP_MM_PERFORM_PLMN_SEARCH_AFTER_LU_ABNORMAL的话 :只需要将#if defined(__MM_PERFORM_PLMN_SEARCH_AFTER_LU_ABNORMAL__)
0x40 |
#endif
修改为 :
0x40 |
也就是将判断条件删掉。

最后,nvram的修改要生效的话,需要修改nvram verno值,也就是升级: NVRAM_EF_SBP_MODEM_CONFIG_LID_VERNO。

2.使用meta修改,这种方法是修改现有值,而不是默认值,这样修改的弊端是在恢复出厂设置和升级版本之后,会恢复默认值,而不是meta修改后的
值,关于meta修改哪一个字节,可以通过方法1介绍的找default值的方法找到这个nvram的结构体定义,从而知道这个feature具体修改哪一个字节或
者bit。


Modem NVRAM 四个分区

(1) nvdata:手机运行过程中,使用(读写)的 NVRAM (除了存在protect_f和protect_s中的少数NVRAM)都是该分区的nvram文件。

存储着普通NVRAM数据、IMEI、barcode、Calibration数据等。

对应的modem path是Z:\NVRAM,对应的AP path是/data/nvram/md/NVRAM,这是在AP CCCI有做映射,

对应的都是nvdata分区modem NVRAM。NVRAM目录下有CALIBRAT、NVD_DATA、NVD_CORE和NVD_IMEI四个目录]

(Smart Phone中IMPORTANT目录是空的,是Feature Phone遗留下来的),后续第三点会对这四个目录进行介绍。

(2) protect_1、protect_2 :一般也称为 protect_f 和 protect_s 分区,protect_s是对 protect_f 中部分NVRAM的复制。

主要存储着SIM Lock数据。具有NVRAM_CATEGORY_IMPORTANT_L4属性的NVRAM LID会存在protect_f分区,

如果还具有NVRAM_ATTR_MULTIPLE属性,会存一个B文件到protect_s中。正常情况下protect_f中的A文件和protect_s中的B文件是相同的,

因为写的时候都会去写两个nvram文件。

(3) nvram:一般也称为 binregion 分区,是一个备份分区,备份具有 NVRAM_CATEGORY_IMPORTANT 和 NVRAM_CATEGORY_CALIBRAT 属性的 NVRAM LID,

备份的也就是CALIBRAT和NVD_IMEI两个目录,具体有IMEI、 barcode、Calibration数据和4G RF driver参数这些NVRAM。

备份可以由META Tool触发 ,ATE校准完会自动触发备份,SN Writer tool写完号后也会自动触发备份。


升级方式对各个NVRAM分区的影响:

因为Format All+Download会擦除所有分区,所以修改任何NVRAM的默认值,然后 Format All+Download升级,均可生效。

因为Firmware Upgrade 只会擦除nvdata分区,所以修改普通NVRAM(NVRAM_CATEGORY_USER属性的NVRAM)的默认值,然后Firmware Upgrade升级,可以生效。

但是修改具有备份的NVRAM(IMEI、 barcode、Calibration数据和4G RF driver)或者存在protect_f/protect_s分区的SIM Lock的默认值,是不会生效的。

如修改备份的4G RF driver NVRAM LID的默认值,Firmware Upgrade升级不生效 :

这是因为备份的4G RF driver NVRAM LID具有NVRAM_CATEGORY_CALIBRAT属性,在binregion中有备份,当Firmware Upgrade升级擦除nvdata分区后,开机后会从binregion中还原回来。

针对这种情况,想要修改默认值生效,Firmware Upgrade升级也是需要将相应的NVRAM LID VERNO+1。

因为Download Only、OTA、SD upgrade 、Push modem不会擦除任何分区,所以如果有修改code中的default值,想升级后生效,那么需要将相应NVRAM LID的VERNO+1,

才会生效,这样将会利用code中的默认值重新生成新nvram文件。

原理:在flash上存储的NVRAM 对应的文件名是由文件名前缀,中间连接符和文件名后缀构成。文件名后缀就是NVRAM LID对应的VERNO。

那么代码中将对应的NVRAM LID VERNO+1后,去flash上面读写这只文件的时候,就会发现不存在,那么就会用code中的默认值重新生成新文件。

假设修改的是NVRAM_EF_IMS_PROFILE_LID这只NVRAM的默认值,它的文件名前缀MT79,升级前的NVRAM_EF_IMS_PROFILE_LID_VERNO号是000,

修改默认值后将NVRAM_EF_IMS_PROFILE_LID_VERNO修改为001,那么Download Only升级前/data/nvram/md/NVRAM/NVD_DATA/目录中就有MT79_000这只文件。

升级后,当读写到这只NVRAM的时候,是按MT79_001去NVD_DATA目录找这只文件,发现没有就会用代码中的默认值重新生成新文件MT79_001。

[1]注意:并不是所有的NVRAM LID都可以通过VERNO+1的方式来升级:

(1)具有NVRAM_CATEGORY_IMPORTANT或NVRAM_CATEGORY_IMPORTANT_L4属性的NVRAM LID不能通过VERNO+1方式升级,否则就会有modem assert,

如NVRAM_EF_IMEI_IMEISV_LID(IMEI)和NVRAM_EF_SML_LID(SIM Lock),这是我们的design,是对IMEI和SIM Lock的保护。

(2)校准NVRAM LID和Barcode(NVRAM_EF_BARCODE_NUM_LID)也不能通过VENRO+1的方式升级,否则校准参数/Barcode就丢失了,不过一般也不会有这类需求。

(3)部分RF NVRAM LID也不能通过VERNO+1的方式升级,目前明确的有CA组合和RF support band不行,如有修改必须全擦升级。


如何在AP端读写Modem NVRAM

AP端去读写Modem NVRAM,可以通过AP端向modem发送AT Command,而modem端需要客制化一条AT Command,同时在command handler中调用接口进行读写nvram。

步骤如下:

(1)AP端向Modem透传AT命令,AP端具体做法可以参考FAQ19648【如何发送AT命令】。

(2)Modem端对AT命令进行客制化,具体可以参考FAQ17997【[AT Command]Smart Phone如何客制化AT command】。

(3)command handler内部通过调用nvram_external_read_data/nvram_external_write_data来读写。

kal_bool nvram_external_read_data(nvram_lid_enum LID, kal_uint16 rec_index, kal_uint8 *buffer, kal_uint32 buffer_size);

kal_bool nvram_external_write_data(nvram_lid_enum LID, kal_uint16 rec_index, kal_uint8 *buffer, kal_uint32 buffer_size);

注意:从91Modem开始读写IMEI和SIM Lock只能使用nvram_external_secure_read_data/nvram_external_secure_write_data接口,不能使用nvram_external_read_data/nvram_external_write_data。

nvram_errno_enum nvram_external_secure_read_data(nvram_lid_enum LID, kal_uint16 rec_index, kal_uint8 buffer, kal_uint32 buffer_size, void reserved_ptr);
nvram_errno_enum nvram_external_secure_write_data(nvram_lid_enum LID, kal_uint16 rec_index, kal_uint8 buffer, kal_uint32 buffer_size, void reserved_ptr);
高通手机重要分区

persist分区:帐号信息, DRM(数字版权管理)相关文件,传感器注册表,对我们的wifi,蓝牙,mac地址来说必不可少。

请注意,恢复出厂设置并不能清空persist分区,另外线刷包不包含persist分区,一旦出问题我们需要动手修复。

modem&radio基带分区:控制手机通讯功能的分区,此分区一旦损坏,通讯相关功能大概率会寄寄,具体表现为不读卡,丢失imei等

fsg

fsc

modemst1

modemst2

这4个分区必须备份

FRP(factory reset protect)

dsp

bluetooth

modem

persistsec

选择备份

misc分区

recovery用这个分区来保存一些关于升级的信息,应对升级过程中的设备掉电重启的状况。

bootloader启动的时候,会读取这个分区里面的信息,以决定系统是否进Recovery System 或 Main System。

fastboot –disable-verity –disable-verification flash vbmeta vbmeta.img

FRP 从字面意思可知,是用于对恢复出厂设置的保护。比如手机丢了,一般情况下小偷都会恢复出厂设置来绕过锁屏密码,这样就能使用了。但若是登录了 google 账号,此时在开机引导处还是要输入密码或者 google 账号才能进入,这就是使用了 FRP。若是从设置里触发恢复出厂设置,不会触发 FRP,可能 google 在设计时认为能进入到设置中操作,此时桌面已经解锁了,那大概率认为是机主所为,所以不会触发。

LabelPurpose of this partition
ModemPartition for modem
FscCookie partition to store Modem File System’s cookies.
SsdPartition for ssd diag module. stores the encrypted RSA keys
Sbl1Partition for secondary boot loader
Sbl1bakBack up Partition for secondary boot loader
RpmPartition for rpm image
RpmbakBack up Partition for rpm image
TzPartition for tz image
TzbakBack up Partition for tz image
HypPartition for hypervisor image
HypbakBack up Partition for hypervisor image
DspPartition for adsp dymanic loaders image
Modemst1Copy of Modem File System (Encrypted)
Modemst2Copy of Modem File System (Encrypted)
DDRPartition for DDR.
FsgGolden copy or backup of Modem File System (Encrypted). Also used to pre-populate the file system.
SecSec.dat contains fuse settings, mainly for secure boot and oem setting
SplashThe splash screen is displayed during the apps bootloader (also called the LK). The display driver in LK will read the splash image data from a separate eMMC partition named as ’splash’
AbootPartition for apps boot loader
AbootbakBack up Partition for apps boot loader
BootThis is the boot partition of your android device,It includes the android kernel and the ramdisk.
RecoveryThis is specially designed for backup. The recovery partition can be considered as an alternative boot partition
DevinfoDevice information including:iis_unlocked, is_tampered, is_verified, charger_screen_enabled, display_panel, bootloader_version, radio_version All these attirbutes are set based on some specific conditions and written on devinfo partition,.
SystemThis partition contains the entire Android OS, other than the kernel and the ramdisk. This includes the Android GUI and all the system applications that come pre-installed on the device
CacheThis is the partition where Android stores frequently accessed data and app components
PersistPartition entry for persist image. which contains data which shouldn’t be changed after the device shipped, for example: calibration data of chips(wifi, bt, camera, etc.), certificates and other security related files.
MiscThis partition contains miscellaneous system settings in form of on/off switches. These settings may include CID (Carrier or Region ID), USB configuration and certain hardware settings etc
KeystorePartition for keystore service.
ConfigPartition needed during display panel initialization. More info at Display_panel_configuration_in_Device_Tree
Oem“It is meant for storing OEM specific info. Customer in this case can decide whether he wants to keep this partition or not typically reserved partitions are kept for future use
LimitsPartition to store LMh params on 8976 target. LMh (Limits management) driver in SBL writes the LMh HW trimmed data into separate partition and uses the same data for later reboots
MotaBackup partition for M ota upgrade
DevcfgPartition needed by TZ for M upgrades.
DipPartition needed for SafeSwitch, feature (FR26255) designed to allow OEMs and carriers to address new smartphone theft bill issues.
MdtpPartition needed for SafeSwitch, feature (FR26255) designed to allow OEMs and carriers to address new smartphone theft bill issues.
UserdataPartition for userdata image
CmnlibVerified boot feature introduced in M needLK to load cmnlib corresponding partitions
KeymasterVerified boot feature introduced in M needs LK to load keymaster from corresponding partitions
SyscfgSyscfg is internal testing for Vmin and CPR characterization
McfgAll MBNs place holder in flash. Specific MBN would be loaded by mcfg image based on the SIM/Carrier.
MsadpUsed for modem debug policy
ApdpUsed for persisting the debug policy. “Debug policy” is used to better support development and debug on secure/fuse-blown devices One instance of the debug policy will be signed for the AP
DpoThis partition will store a policy override

在5G参数和IMEI写入Modemst1分区后将Modemst1分区的所有数据
复 制 到 F S G 分 区 进 行 保 存 ;

每 次 开 机 后 检 查Modemst1分区读写是否正常:

  1. 当Modemst1分区读写异常时,清空Modemst1分区;
  2. 当Modemst1分区为空时,将FSG分区复制至Modemst1分区进行恢复;
  3. 当Modemst1分区读写正常时,完成后续正常开机流程。

优点在于,充分利用了FSG分区的存储空间,作为Modemst1分区的影子存在,提高分区利用率的同时,做到物联网设备实现完全恢复出
厂设置。巧妙绕开了以往Modemst1分区在出厂后不能再reset的问题,避免因5G参数异常而必须回厂维修的缺陷。

NV的工作分区被高通平台定义为modemst1或modemst2,工作中modemst1 分区或modemst2分区等价

5G参数在出厂时一直保存在modemst1分区中,路由器 在运行过程中不停的和modemst1分区进行读写交互。

存储NV参数初始化值的分区是FSG分区,高通平台会制作一个包含NV参数初始化值的image文件,将这个image文件下载到FSG分区中

高通平台在启动过程中将FSG分区copy到modemst1分区的判断依 据是,判断当前NV工作modemst1分区是否为空,如果是空的,则将FSG分区中image 文件内的NV参数初始化值更新到modemst1分区中。

一般5G设备在空片第一次下载软件后,因为modemst1分区为空,所以FSG分区中的NV参数初始化值会写入modemst1分区中。然后在生产环节会向 modemst1分区写入校准参数、IEMI等5G重要参数,导致modemst1分区以后不能擦 除。因为modemst1分区不能擦除,自然不会再出现为空的状态,FSG分区的数据也 不会再有机会写入modemst1分区中。modemst1分区不能擦除的原因不是该分区不能 读写操作,而是擦除了该分区数据后,会失去出厂时写入的校准参数、IEMI等5G重 要参数。这些5G重要参数,不回厂维修的话,在物联网设备上没有任何备份。

首先对空 片进行软件下载和软系统安装,高通平台的工作机制在modemst1分区为空时,会将 FSG分区存有NV参数初始化值全部复制至modemst1分区中。

然后对modemst1分区进行各种出厂设置和参数写入,例如依次进行:单板写号、校准综测参数写入、单板电流参数写入、单板功能写入、整机电流写入、耦合测试参 数写
入、整机功能写入以及IMEI写入等操作

最后将上述操作完毕的modemst1分区复制至FSG分区,完成物联网设备5G参数的保存工作。

物联网设备在正常使用过程中不操作fsg分区 ,fsg分区参数始终是设备出厂时的初始状态。

物联网设备上网、注册5G网络时,根据需要读取modemst1分区的参数,运行状 态会被写入本设备的modemst1分区中,因此运行过程中不停地和modemst1分区进行 数据交互。

频繁的数据交互,自然大大提高了5G参数的出错几率。当读写modemst1分区出 现异常,读写异常影响到设备注册网络和modem正常运行,此时需要将modemst1分 区恢复到出厂时的状态。

用户只需将出现异常的物联网设备重新 开机两次即可解决,

第一次是清空Modemst1分区,第二次是完全Reset Modemst1分 区(也就是将fsg复制到moemst1)

每次开机后,物联网设备都检查modemst1分区的读写功能,此时 有三种可能,一是为空,二是正常,三是异常。


1)当Modemst1分区读写异常时,清空Modemst1分区;

2)当Modemst1分区为空时,将FSG分区复制至Modemst1分区进行恢复;
3)当Modemst1分区读写正常时,完成后续正常开机流程。

fastboot flash fsg fsg.mbn

fastboot erase modemst1

fastboot erase modemst2

高通平台EFS的制作

用来制作EFS的机器称为A,用来验证EFS的机器称为B。
1.
在modem_proc/core/storage/efs/inc/fs_config_i.h中增加以下三行:
#ifndef FEATURE_EFS_ENABLE_FACTORY_IMAGE_SECURITY_HOLE
#define FEATURE_EFS_ENABLE_FACTORY_IMAGE_SECURITY_HOLE
#endif
2.对于没有使能secure boot的device,在modem_proc/core/storage/fs_tar/src/fs_tar.c中增加一行:
#define FEATURE_FS_TAR_ALLOW_DUMMY_KEY
使能了secure boot的device,不需要定义上面的宏。
3.清除modem后重新编译,编译完成后进入common/build目录执行脚本python update_common_info.py,将新生成的common/build/bin/asic/NON-HLOS.bin文件通过fastboot烧进手机的modem分区。
4.重启手机,打开QPST Software Download软件,切换到Restore页面,USB连接手机,将QCN文件(该QCN文件配置了若干NV项)烧入手机,手机会自动重启。
5.重启就绪后,连接USB线至手机,确保QPST Software Download软件打开,将modem_proc/core/storage/tools/efsreadimage.pl文件放到C:\Users\yuntaohe\Desktop\EFS目录下,打开windows上的cmd窗口,进入C:\Users\yuntaohe\Desktop\EFS目录下,执行perl efsreadimage.pl -z,在当前目录下会生成新文件fs_image.tar.gz。
6.将fs_image.tar.gz上传到ubuntu的modem_proc/core/storage/tools/qdst/目录下,在该目录下执行python QDSTMBN.py fs_image.tar.gz,生成fs_image.tar.gz.mbn
7.将fs_image.tar.gz.mbn和modem_proc/build/ms/bin/8909.gen.prod/efs_image_meta.bin复制到modem_proc/core/bsp/efs_image_header/tools目录下,在该目录下执行python efs_image_create.py efs_image_meta.bin fs_image.tar.gz.mbn,生成fs_image.tar.gz.mbn.img。
至此,EFS制作完成,EFS的验证过程如下:
1.
对于没有使能secure boot的device,在modem_proc/core/storage/fs_tar/src/fs_tar.c中增加一行:
#define FEATURE_FS_TAR_ALLOW_DUMMY_KEY
使能了secure boot的device,不需要定义上面的宏。
2.清除modem后重新编译,编译完成后进入common/build目录执行脚本python update_common_info.py,重新生成common/build/bin/asic/NON-HLOS.bin文件。
3.生成全0的二进制文件:在linux下执行dd if=/dev/zero of=zero.bin bs=<modem_st1 size> count=1,modem_st1 size参看rawprogram0_unspare.xml文件:
  <program SECTOR_SIZE_IN_BYTES=”512″ file_sector_offset=”0″ filename=”zero.bin” label=”modemst1″ num_partition_sectors=”3072″ physical_partition_number=”0″size_in_KB=”1536.0″ sparse=”false” start_byte_hex=”0x8680000″ start_sector=”275456″ />
本例中,modem_st1 size = 1536 * 1024 = 1572864。
4.将步骤2生成的NON-HLOS.bin和步骤3生成的zero.bin以及生成EFS的fs_image.tar.gz.mbn.img放入刷机包中。
5.修改刷机包中的rawprogram0_unspare.xml文件:
-<program SECTOR_SIZE_IN_BYTES=”512″ file_sector_offset=”0″ filename=”” label=”modemst1″ num_partition_sectors=”3072″ physical_partition_number=”0″ size_in_KB=”1536.0″ sparse=”false” start_byte_hex=”0x8680000″ start_sector=”275456″ />
-<program SECTOR_SIZE_IN_BYTES=”512″ file_sector_offset=”0″ filename=”” label=”modemst2″ num_partition_sectors=”3072″ physical_partition_number=”0″ size_in_KB=”1536.0″ sparse=”false” start_byte_hex=”0x8800000″ start_sector=”278528″ />
-<program SECTOR_SIZE_IN_BYTES=”512″ file_sector_offset=”0″ filename=”” label=”fsg” num_partition_sectors=”3072″ physical_partition_number=”0″ size_in_KB=”1536.0″ sparse=”false” start_byte_hex=”0xc008000″ start_sector=”393280″ />
+<program SECTOR_SIZE_IN_BYTES=”512″ file_sector_offset=”0″ filename=”zero.bin” label=”modemst1″ num_partition_sectors=”3072″ physical_partition_number=”0″ size_in_KB=”1536.0″ sparse=”false” start_byte_hex=”0x8680000″ start_sector=”275456″ />
+<program SECTOR_SIZE_IN_BYTES=”512″ file_sector_offset=”0″ filename=”zero.bin” label=”modemst2″ num_partition_sectors=”3072″ physical_partition_number=”0″ size_in_KB=”1536.0″ sparse=”false” start_byte_hex=”0x8800000″ start_sector=”278528″ />
+<program SECTOR_SIZE_IN_BYTES=”512″ file_sector_offset=”0″ filename=”fs_image.tar.gz.mbn.img” label=”fsg” num_partition_sectors=”3072″ physical_partition_number=”0″ size_in_KB=”1536.0″ sparse=”false” start_byte_hex=”0xc008000″ start_sector=”393280″ />
6.用QFIL刷机后,USB连接PC,用QXDM查看若干NV是否生效。

注:若B机器使能了secure boot,那么生成的EFS文件fs_image.tar.gz.mbn.img需要经过签名后放入刷机包。


在大多数比较新的高通设备上有两个分区,分别叫做xbl和abl。 xbl 作为高通平台上的UEFI固件,内含基于EFI的程序和驱动(如fastboot)。对于LA平台,如果开机时Fastboot模式未被触发,xbl将会立即加载abl。 abl 只在高通LA平台上存在,其源代码可以在CodeAurora上被找到,它内含一个名叫LinuxLoader.efi的EFI程序,用来加载并启动位于boot分区里的安卓Linux内核。 不幸的是,在进入市场的大多数零售设备上,xbl与abl均需经过厂商签名,我们不能对其作任何修改。因此,用设备自带的bl是不可能直接启动Windows的。 我们所采取的途径是将我们的UEFI固件伪装成一个Linux内核。通过在映像的开头添加一段代表Linux内核的代码,并在尾部附加设备树(device tree),abl就能很高兴地加载UEFI映像了。

sprd nvmerge

nvmerge是用于处理nvitem分区升级的工具。可以将手机中的某些需要保留的nv项
(如校准参数)备份下来,保证升级后不会被重置。这里的nv项,指的是与modem相
关的一些参数,这些参数均保存在nvitem分区。

其中具体的要备份的items保存在nvmerge.cfg 文件中,这个文件也会被打包进升级
包,里面的内容可以根据需要进行增减,以达到备份某些特殊数据的目的,比如IMEI号
等。

此文件在Android 4.4平台上是存放在bootable/recovery/nvmerge/下面,

在Android5.1以后平台上是存放在device/sprd/XXX/下面,

XXX代表芯片系列,如scx35l, iwhale2,sharkl2等。

/tmp/nvmerge

/tmp/nvmerge.cfg

/dev/block/platform/sprd-sdhci.3/by-name/wfixnv1

/cache/wnvitem.bin

/cache/merged_wnvitem.bin

0x40000

write_emmc_image(“/cache/merged_wnvitem.bin”, “/dev/block/platform/sprd-sdhci.3/by-name/wfixnv1”);

write_emmc_image(“/cache/merged_wnvitem.bin”, “/dev/block/platform/sprd-sdhci.3/by-name/wfixnv2”);

如何区分 M.2 卡之间的差异

M.2 平台是多用途的平台,支持多种 M.2 卡。

M.2 卡可以在 M.2 平台内配置不同的硬件和功能。(例如:为了满足计算机的各个需求并为用户提供一系列配置选项。)

物理尺寸是最容易观察到的卡之间的差异。M.2 标准使用数字命名约定来标识卡的特定属性和功能。

M.2 卡可能包括:

Wi-Fi 和蓝牙卡的组合
使用 SATA 总线的 SanDisk SSD
也使用 PCIe 总线的 Intel SSD
可使用多达四个 PCIe 通道 (x4) 的 Samsung SSD


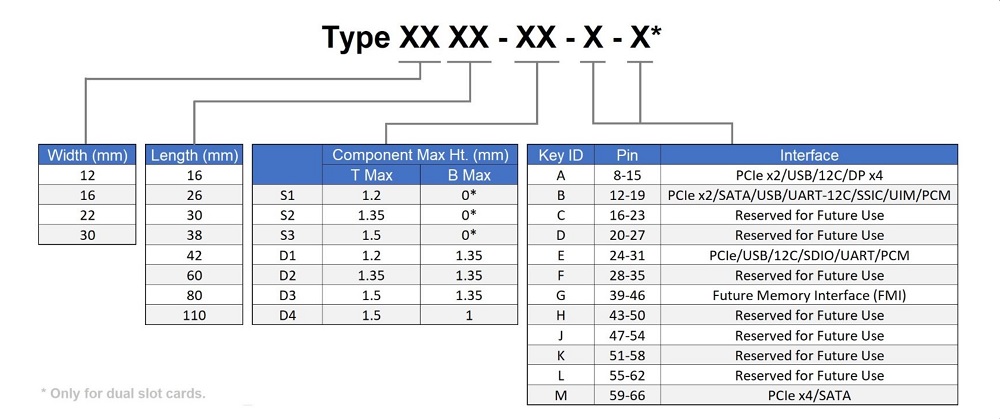
数字命名约定用于定义卡的大小和功能,方法如下图

前两位数字指定宽度(以毫米为单位)
随后的两(或三)位数字指定长度(以毫米为单位)
最后一个字母用于指定密钥、接口和总线(双插槽卡将使用两个字母)

可以看出,5G NR模块,只能用B Key类型

可用尺寸接口常见用途
A1630、2230、3030PCIE x2/USB 2.0/I2C/DisplayPort (DP) x4WiFi/蓝牙/WWAN
B2230、2242、2260、2280、3042、22110PCIe x2/USB 2.0/USB 3.0/音频/PCM/IUM/SSIC/I2CSATA/PCIe x2/SSD
E1630、2230、3030PCIe x2/USB 2.0/I2C/SDIO/UART/PCMWiFi/蓝牙/WWAN
M2230、2242、2260、2280、22110PCIe x4/SATAPCIe x4/SSD

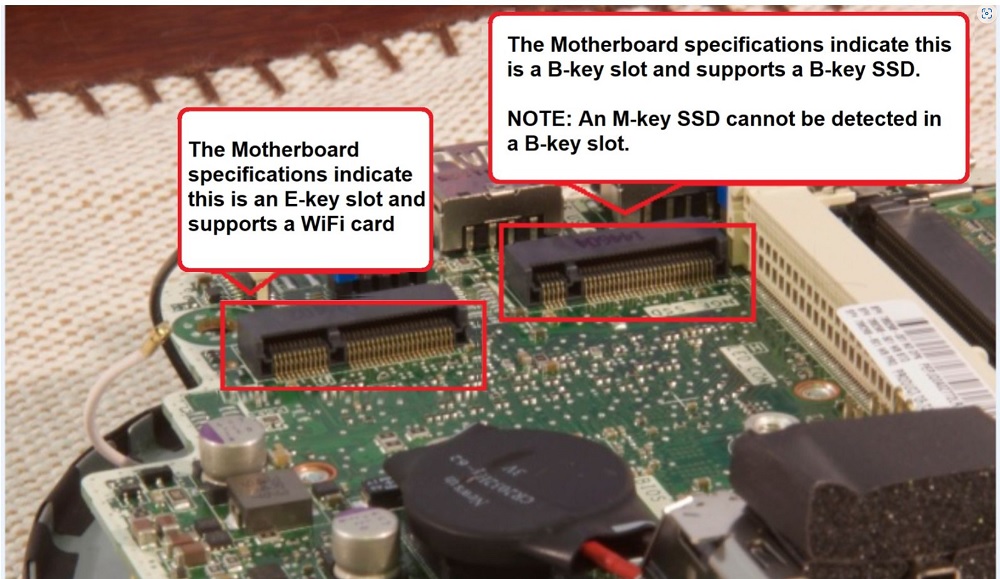
主板上的 M.2 插槽

所有主板 M.2 插槽均为 22 毫米宽,即使是支持 30 毫米宽卡的插槽

两种类型的 M.2 SSD(SATA 和 PCI-E)

  1. 采用 SATA 总线的 SSD 倾向于使用 B-key 接口
  2. 采用 PCIe x2 总线的 SSD 可以使用 B-key 和 M-key 接口(以最大限度地提高兼容性)

提醒:采用 PCIe x4 总线的 SSD(快速的 SSD)使用 M-key 接口,因为它是唯一支持 PCIe x4 通道的接口。

M.2 SSD 之间的性能差异是什么?

一般而言:

  • 采用 SATA 总线的 M.2 SSD 在性能方面与采用 SATA 接口的 SSD 相似,但尺寸更小
  • 采用 PCIe 总线的 M.2 SSD 比采用 SATA 总线的 M.2 SSD 快
  • 采用 PCIe 总线的 M.2 M-key 接口的 SSD 比采用 PCIe 总线的 M.2 B-key 接口的 SSD 快

总而言之:不管是何种外形规格,采用 SATA 总线的 SSD 均能够以 SATA 速度运行。PCIe 总线比 SATA 总线快,而 M-key 接口的 SSD 比 B-key 接口的 SSD 快。

提醒:所有这些性能指标都与总线和总线接口相关。此外,还有其他一些此处未讨论的因素会决定单个 SSD 的性能。

Android在高版本中如何允许访问非 SDK 接口

https://developer.android.com/guide/app-compatibility/restrictions-non-sdk-interfaces?hl=zh-cn

Android 10(API 级别 29)或更高版本

如需允许访问非 SDK 接口,请使用以下 adb 命令:

 adb shell settings put global hidden_api_policy 1

如需将 API 强制执行策略重置为默认设置,请使用以下命令:

adb shell settings delete global hidden_api_policy

可以将 API 强制执行策略中的整数设置为以下值之一:

0:停用所有非 SDK 接口检测。如果您使用此设置,系统会停止输出针对非 SDK 接口使用行为的所有日志消息,并阻止您使用 StrictMode API 测试应用。建议不要使用此设置。
1:允许访问所有非 SDK 接口,但同时输出日志消息,并且在其中显示针对所有非 SDK 接口使用情况的警告。如果使用此设置,您仍可以使用 StrictMode API 来测试应用。
2:禁止使用列于屏蔽名单中的非 SDK 接口,或针对您的目标 API 级别被有条件屏蔽的非 SDK 接口

在系统映像中的什么位置可以找到非 SDK API 名单?
它们是在平台 dex 文件中的字段和方法访问标记位中编码的。 系统镜像中没有单独的文件包含这些名单

搭载同一 Android 版本的不同 OEM 设备上的非 SDK API 名单是否相同?
原始设备制造商 (OEM) 可以将自己的接口添加到屏蔽名单(黑名单)中,但是无法从 AOSP 非 SDK API 名单中移除接口。CDD 会阻止此类更改,并且 CTS 测试会确保 Android 运行时强制执行相应名单。

针对非 SDK 接口的限制是否适用于包括系统应用和第一方应用在内的所有应用,而不仅仅是第三方应用?

是,但我们对使用平台密钥进行签名的应用和某些系统映像应用免除这项限制。请注意,免除限制的情况仅适用于系统映像应用(或更新后的系统映像应用)。软件包白名单仅适用于针对私有平台 API(而不是 SDK API)构建的应用(其中 LOCAL_PRIVATE_PLATFORM_APIS := true)。

JNI绕过去的方法:
破坏调用堆栈绕过去,使 VM 无法识别调用方

可以通过 JniEnv::AttachCurrentThread(…) 函数创建一个新的 Thread 来完成。

jni层新建个线程,在这个线程里去反射,去除掉了java调用的信息,从而让安卓系统以为这个是系统调用。

frameworks/base/config/hiddenapi-greylist.txt

APK Sig Block 42

块的结构

8字节  块的大小 (整个块的大小,不包括这8个字节)
ID-Value序列
8字节  块的大小 (值=上面的块大小)
16字节  Magic标识, 内容为"APK Sig Block 42"

ID-Value序列的结构

8字节的Length
4字节的ID1
Value1
----------
Length
ID2
Value2
----------
...
----------
Length
IDn
Valuen

APK的签名信息就是其中一项,ID为0x7109871A

1. 首先根据ECDR的魔数0x06054b50(hex:50 4b 05 06)确定ECDR部分的起始地址,也就是 从文件末尾往前搜索 504B0506
2. ECDR的起始地址+16, 就存储着, 中央目录起始地址

—————————

1. 确定中央目录地址(中央目录地址刚好是APK签名地址的尾地址)
2. 根据中央目录地址和APK签名块的长度确定ID-Value序列的首地址和尾地址
————————-

APK 签名方案 v2分块是一个签名序列,说明可以使用多个签名者对同一个APK进行签名。每个签名信息中均包含了三个部分的内容:

1. 带长度前缀的signed data
其中包含了通过一系列算法计算的摘要列表、证书信息,以及extra信息(可选);

2. 带长度前缀的signatures序列
通过一系列算法对signed data的签名列表。签名时使用了多个签名算法,在签名校验时会是选择系统支持的安全系数最高的签名进行校验;

3. 证书公钥

android的so在proc maps中找不到了

在构建应用的发布版本时,请确保在应用的 build.gradle 文件中将 useLegacyPackaging 设置为 false,以便将未压缩的 .so 文件打包到 APK 中。停用此标志可防止 PackageManager 在安装过程中将 .so 文件从 APK 复制到文件系统,并具有减小应用更新的额外好处。


从 AGP 4.2.0 开始,DSL 选项 useLegacyPackaging 取代了 extractNativeLibs 清单属性。请使用应用的 build.gradle 文件中的 useLegacyPackaging(而非清单文件/manifest中的 extractNativeLibs)来配置原生库压缩行为。


extractNativeLibs属性指示软件包安装程序是否将原生库从 APK 提取到文件系统。如果设置为 “false”,则原生库以未压缩的形式存储在 APK 中。虽然您的 APK 可能较大,但应用加载速度更快,因为库是在应用运行时直接从 APK 加载。

extractNativeLibs 的默认值取决于 minSdkVersion 和您使用的 AGP 版本。在大多数情况下,默认行为很可能符合您的预期,您无需显式设置此属性。


安卓高版本在安装apk时可以不解压lib中的so文件,而将其直接映射到内存中实现加载


建议以未压缩的形式打包原生库,因为这会减小应用安装大小,缩减应用下载大小,并缩短用户的应用加载时间。不过,如果您希望 Android Gradle 插件在构建应用时打包压缩后的原生库,请在应用的 build.gradle 文件中将 useLegacyPackaging 设置为 true:

android {
    packagingOptions {
        jniLibs {
            useLegacyPackaging true
        }
    }
}

在逆向中很常用的一个技巧就是对apk安装后的so文件进行patch然后替换原来的so文件,这样可以绕过签名校验。这种方式的前提是extractNativeLibs必须为true,否则在apk安装目录下并不会找到任何的so文件可以让我们进行patch。

地址                  权限    偏移  dev  inode                          路径
7b7f633000-7b7f635000 r--s 000a5000 fe:06 490828                         /data/app/~~dma2nKNikFTmU3qVUUlOuw==/xxx-t6ddVoyboOdWOHRpLk9xhQ==/base.apk
7b7f635000-7b7f637000 r--s 000b0000 fe:06 490828                         /data/app/~~dma2nKNikFTmU3qVUUlOuw==/xxx-t6ddVoyboOdWOHRpLk9xhQ==/base.apk

其中,地址  表示在 进程的地址空间的 起始地址
    权限, 表示该区段  是否可读,可写, 可执行, 可共享           上面就表示 可读, 可共享
偏移: If the region was mapped from a file (using mmap), this is the offset in the file where the mapping begins. If the memory was not mapped from a file, it's just 0.

设备:  If the region was mapped from a file, this is the major and minor device number (in hex) where the file lives.

inode:  If the region was mapped from a file, this is the file number(文件号)

路径:   If the region was mapped from a file, this is the name of the file. This field is blank for anonymous mapped regions.


在搭载 Android 10(API 级别 29)和更高版本的设备上,您现在可以告知平台直接从应用的 APK 文件运行嵌入式 DEX 代码。如果攻击者曾设法篡改了设备上本地编译的代码,此选项有助于防止这类攻击。

1) 在应用清单文件的 application 元素中将 android::useEmbeddedDex 属性设置为 true。
2) 在模块级 build.gradle.kts 文件(如果您使用的是 Groovy,则为 build.gradle 文件)中将 useLegacyPackaging 设置为 false


New approach introduced by Google in Marshmallow (Android 6) is enabled by setting extractNativeLibs to “false”. It expects the libraries stored uncompressed in the APK (STORE method) and zipaligned. There’s no need to extract them during installation. On app startup, the libraries can be loaded (memmapped) directly from the APK.

Android 6.0之后,就可以, app在启动时,直接从apk载入 lib, (mem mapped)


从Android 6.0 & AGP 3.6.0开始,系统支持直接加载apk中未压缩的so,也就是说在App安装时,系统不再将apk中的so解压,而在加载so时,直接从apk中加载。

findLibrary最终的实现是在DexPathList.findLibrary中,此时libraryName为”mytest”,经过System.mapLibraryName转换后,得到fileName为”libmytest.so”

加载so是先查找App路径下,然后再查找系统路径。通过前缀,也能发现,支持从zip文件base.apk中直接加载so

base.apk!/lib/arm64-v8a/libmytest.so

NativeLoaderNamespace::Load最终调用android_dlopen_ext加载所需so,采用Flag RTLD_NOW执行立即加载,android_dlopen_ext为Android扩展的dlopen实现,至此可以发现,Android的System.loadLibrary底层调用android_dlopen_ext来加载so,而非OpenJDK采用的dlopen

__loader_android_dlopen_ext

如果是直接从apk中加载so。name将类似于/data/app/~~WdKfQO1G6r3htDT7Rgo1DQ==/com.huchao.mysystemloadlibrary-6wbqoASC9saPFntEre3_MQ==/base.apk!/lib/arm64-v8a/libmytest.so,其路径中包含kZipFileSeparator(!/)将去apk文件中查找,调用open_library_in_zipfile,返回打开的apk文件的fd。

x25519

python有两个实现

https://gist.github.com/nickovs/cc3c22d15f239a2640c185035c06f8a3
保存为 curve25519.py

"""A pure Python implementation of Curve25519

This module supports both a low-level interface through curve25519(base_point, secret)
and curve25519_base(secret) that take 32-byte blocks of data as inputs and a higher
level interface using the X25519PrivateKey and X25519PublicKey classes that are
compatible with the classes in cryptography.hazmat.primitives.asymmetric.x25519 with
the same names.
"""

# By Nicko van Someren, 2021. This code is released into the public domain.

#                                  #### WARNING ####

# Since this code makes use of Python's built-in large integer types, it is NOT EXPECTED
# to run in constant time. While some effort is made to minimise the time variations,
# the underlying math functions are likely to have running times that are highly
# value-dependent, leaving this code potentially vulnerable to timing attacks. If this
# code is to be used to provide cryptographic security in an environment where the start
# and end times of the execution can be guessed, inferred or measured then it is critical
# that steps are taken to hide the execution time, for instance by adding a delay so that
# encrypted packets are not sent until a fixed time after the _start_ of execution.


# Implements ladder multiplication as described in "Montgomery curves and the Montgomery
# ladder" by Daniel J. Bernstein and Tanja Lange. https://eprint.iacr.org/2017/293.pdf

# Curve25519 is a Montgomery curve defined by:
# y**2 = x**3 + A * x**2 + x  mod P
# where P = 2**255-19 and A = 486662

P = 2 ** 255 - 19
_A = 486662


def _point_add(point_n, point_m, point_diff):
    """Given the projection of two points and their difference, return their sum"""
    (xn, zn) = point_n
    (xm, zm) = point_m
    (x_diff, z_diff) = point_diff
    x = (z_diff << 2) * (xm * xn - zm * zn) ** 2
    z = (x_diff << 2) * (xm * zn - zm * xn) ** 2
    return x % P, z % P


def _point_double(point_n):
    """Double a point provided in projective coordinates"""
    (xn, zn) = point_n
    xn2 = xn ** 2
    zn2 = zn ** 2
    x = (xn2 - zn2) ** 2
    xzn = xn * zn
    z = 4 * xzn * (xn2 + _A * xzn + zn2)
    return x % P, z % P


def _const_time_swap(a, b, swap):
    """Swap two values in constant time"""
    index = int(swap) * 2
    temp = (a, b, b, a)
    return temp[index:index+2]


def _raw_curve25519(base, n):
    """Raise the point base to the power n"""
    zero = (1, 0)
    one = (base, 1)
    mP, m1P = zero, one

    for i in reversed(range(256)):
        bit = bool(n & (1 << i))
        mP, m1P = _const_time_swap(mP, m1P, bit)
        mP, m1P = _point_double(mP), _point_add(mP, m1P, one)
        mP, m1P = _const_time_swap(mP, m1P, bit)

    x, z = mP
    inv_z = pow(z, P - 2, P)
    return (x * inv_z) % P


def _unpack_number(s):
    """Unpack 32 bytes to a 256 bit value"""
    if len(s) != 32:
        raise ValueError('Curve25519 values must be 32 bytes')
    return int.from_bytes(s, "little")


def _pack_number(n):
    """Pack a value into 32 bytes"""
    return n.to_bytes(32, "little")


def _fix_secret(n):
    """Mask a value to be an acceptable exponent"""
    n &= ~7
    n &= ~(128 << 8 * 31)
    n |= 64 << 8 * 31
    return n


def curve25519(base_point_raw, secret_raw):
    """Raise the base point to a given power"""
    base_point = _unpack_number(base_point_raw)
    secret = _fix_secret(_unpack_number(secret_raw))
    return _pack_number(_raw_curve25519(base_point, secret))


def curve25519_base(secret_raw):
    """Raise the generator point to a given power"""
    secret = _fix_secret(_unpack_number(secret_raw))
    return _pack_number(_raw_curve25519(9, secret))


class X25519PublicKey:
    def __init__(self, x):
        self.x = x

    @classmethod
    def from_public_bytes(cls, data):
        return cls(_unpack_number(data))

    def public_bytes(self):
        return _pack_number(self.x)


class X25519PrivateKey:
    def __init__(self, a):
        self.a = a

    @classmethod
    def from_private_bytes(cls, data):
        return cls(_fix_secret(_unpack_number(data)))

    def private_bytes(self):
        return _pack_number(self.a)

    def public_key(self):
        return _pack_number(_raw_curve25519(9, self.a))

    def exchange(self, peer_public_key):
        if isinstance(peer_public_key, bytes):
            peer_public_key = X25519PublicKey.from_public_bytes(peer_public_key)
        return _pack_number(_raw_curve25519(peer_public_key.x, self.a))

调用

from binascii import hexlify, unhexlify
from curve25519 import X25519PrivateKey

private_key     = unhexlify('')
peer_public_key = unhexlify('')

x25519x = X25519PrivateKey.from_private_bytes(private_key)

shared_secret = x25519x.exchange(peer_public_key)

print(hexlify(shared_secret))

另外一个实现
https://github.com/1ocalhost/x25519

调用方法

from binascii import hexlify, unhexlify
import x25519

private_key    = unhexlify('')
public_key = x25519.scalar_base_mult(private_key)
print(hexlify(public_key))

peer_public_key = unhexlify('')
shared_secret = x25519.scalar_mult(private_key, peer_public_key)
print(hexlify(shared_secret))

生成key

aaa = x25519.djbec.genkey()
bbb = x25519.djbec.encodeint(aaa)
print('priv=', hexlify(bbb))

rust

use rand_core::{OsRng, RngCore};
use x25519_dalek::{EphemeralSecret, StaticSecret, PublicKey,  x25519};


use hex::FromHex;


fn main() {

    //let alice_secret = StaticSecret::new(OsRng);
    //let alice_secret = StaticSecret::random_from_rng(&mut OsRng);
    
    let mut x4 = [0u8; 32];
    let _ = hex::decode_to_slice("", &mut x4 as &mut [u8]).unwrap();
    let alice_secret = StaticSecret::from(x4);    
    
    let xxx = alice_secret.to_bytes();  
    println!("alice secret={}", hex::encode_upper(&xxx));
    
    let alice_public = PublicKey::from(&alice_secret);
    
    
    // let bob_secret = StaticSecret::new(OsRng);
    //     let bob_secret = StaticSecret::random_from_rng(&mut OsRng);
    //let tmp = hex::decode("").unwrap();
    //let x4: [u8; 32] = (&tmp[..]).try_into().unwrap();    
    let x4 = <[u8; 32]>::from_hex("").unwrap();
    
    let bob_secret = StaticSecret::from(x4);     
    let bob_public = PublicKey::from(&bob_secret);
    
    let yyy = bob_secret.to_bytes();
    println!("bob secret={}", hex::encode_upper(&yyy));
    
    let zzz = bob_public.to_bytes();
    println!("bob public={}", hex::encode_upper(&zzz));    
    
    //let alice_shared_secret = alice_secret.diffie_hellman(&bob_public);
    //let bob_shared_secret = bob_secret.diffie_hellman(&alice_public);
    let alice_shared = x25519(xxx, zzz);
    let bob_shared = x25519(yyy, alice_public.to_bytes());    
    
    
    assert_eq!(alice_shared, bob_shared); 
    
    println!("shared={}", hex::encode_upper(&alice_shared));   


}

段刚-关于软件保护的若干忠告

来自《加密与解密》第17章
1. 尽量自行开发保护机制,不要依赖任何非自行开发的代码。
在不影响效率的情况下,可以用虚拟机保护软件处理需要保护的核心代码

2.不要依赖壳的保护。加密壳都能被解开或者脱壳。现在许多加密壳转向
虚拟机加密方向就是利用了这一特点。如果时间允许且有相应的技术能力,
可以设计自己的加壳压缩方法。如果利用现成的加壳工具,最好不要选择
流行的工具。保护强度与流行程度成反比。越是流行的工具,就越有可能
由于广泛深入地研究而有了通用的脱壳/解密办法。

3.增加对软件自身完整性的检查,包括对磁盘文件和内存映像的检查,以防止
有人修改程序,进而达到破解的目的。

4. 不要采用一目了然的名字来命令函数和文件,例如
IsLicenseVersion key.data 等。
所有与软件加密相关的字符串都不能以明文的形式直接存放在可执行文件中。
这些字符串最好是动态生成的。

5. 给用户的提示信息越少越好。因为任何蛛丝马迹都可能导致解密者直接
到达核心代码出。 例如,发现破解企图后,不要立即向用户发挥提示信息,
可以在系统的某个地方做一个记号,经过一段随机时间后使软件停止工作。
或者让软件“装作”正常工作,但在所处理的数据中加入一些”垃圾”.

6. 将注册码和安装时间记录在多个地方。

7. 检查注册信息和时间的代码越分散越好。
不要调用同一个函数 或者 判断同一个全局标志。
如果这样做,只要修改一个地方,其他地方就都破解了。

8. 不要通过一些众所周知的API来获取系统时间。可以通过读取关键系统
文件的修改时间来获取系统时间的相关信息。

9. 如果有可能,应采用连网检查注册码的方法,而且数据在网上传输时要加密。

10. 编程时在软件嵌入反跟踪代码,以提高安全性。

11. 在检查注册信息时插入大量无用的运算以误导解密者,并在检查出错误的注册信息后
加入延时机制。

12. 为软件保护增加一定的随机性。例如,除了在启动时检查注册码,还可以在
软件运行的某个时刻随机检查注册码。随机值还可以很好地防范那些模拟工具的解密
,例如软件狗模拟程序。

13. 如果采用注册码的保护方式,最好是一机一码,也就是注册码与机器特征相关。
这样,一台机器上的注册码就无法在另外一台机器上使用。
机器特征要从一些不可修改 的值上获取。也要防止API被hook

14. 如果试用版与正式版是独立的版本,可试用版本软件不具有某项功能,
则不要只禁用相关菜单,而要彻底删除相关代码,是编译后的程序中根本没有
相关的功能代码。

15. 如果软件中包含驱动程序,则最好将保护嗲吗放在驱动程序中。
驱动程序在访问系统资源时受到的限制比普通应用程序少得多,这也给软件设计者
提供了发挥的余地。

16. 如果采用keyfile的保护方式,则keyfile的体积不能太小。可以将其结构设计
得复杂一些,在程序的不同位置,对keyfie的不同部分进行复杂的运算和检查。

17. 自己设计的检查注册信息的算法不能过于简单,最好采用成熟的密码学算法。

设计加密方案时 应该多从解密的角度考虑,这样才能比较合理地运用各种技术。
当然,任何加密方案都无法达到完美的程序。
因此,在设计时,要考虑其他方面的平衡。